As someone who has passed (and failed) several Red Hat exams, I can tell what it takes to achieve the long yearned (?) certification: lots of luck practice. Really a lot of practice, and this post goes about getting that practice.
First of all, because of the NDA you sign when you take any Red Hat exam, you cannot speak about specifics of the exam tasks. You can, however, talk about the exam objectives, which in the case of the EX200 and EX300 (the most popular, as they give the RHCSA and RHCE certifications respectively) are available here:
- http://www.redhat.com/en/services/training/exm00-red-hat-certified-system-administrator-rhcsa-exam
- http://www.redhat.com/en/services/training/ex300-red-hat-certified-engineer-rhce-exam
Before you start practicing, find out what is the OS version that the exam is going to be based on. It won’t help you much to practice Network Teaming or Firewalld (RHEL7 features) if at the time of the exam you find out it’s based on RHEL6. The practice environment that I’m going to describe is based on CentOS7, so it’s compatible with a RHEL7 based exam.
In order to execute all of the exam objectives, we’ll be creating the following virtual infrastructure:

So in detail, we are going to:
- Create an internal virtual network to interconnect the practice virtual machines without interfering with the host’s public network, nor having direct internet access.
- Create a server that will automatically provide the following network services:
- DHCP: Will provide IP addresses from 10.11.1.100 to 10.11.1.109 for the “labo” machines.
- DNS: Will provide direct and reverse name resolution for the example.com zone (the VMs mentioned on the previous bullet).
- Kerberos: A master server ready to be used for user and services authentication, such as NFS.
- LDAP: This service will provide pre-configured user and groups information to the “dc=example,dc=com” DN.
- Yum: The iso image that I’m using to install the server will stay mounted and available as a yum repository to install the OS and additional packages on the “labo” servers.
- PXE: And the best of all, the server machine will be configured as a PXE server, so you can build and rebuild the labo machines automatically with an included basic kickstart.
An additional note about the items above. Knowing how to configure a Kerberos, DHCP or LDAP is very valuable, but trust me, if it is not an objective of the exam that you’re taking (and it’s not on the EX200 and EX300), you better stay away from it and concentrate exclusively on the exam objectives. That is why this process will take care of this tasks automatically through the provided kickstart, so that you don’t waste time configuring the basics. Additionally, this process allows you to rebuild the environment as many times as you need, leaving it always on the same starting point.
Note that the requirements to run this environment on the physical host are:
- At least 3GB of memory, one for each vm, one for the host (you won’t actually be using all that, but it’s a good practice)
- A CPU that supports virtualization (look for the VT-x or AMD-V flags on Intel and AMD respectively), and make sure that you have this feature enabled on BIOS. For example, on an Intel machine:
virthost[/root]# lscpu | grep Virtualization
Virtualization: VT-x
virthost[/root]#
Now, assuming that you’re starting almost from scratch and only have one single CentOS/RHEL 6 or 7 machine, this is the process to get you ready to start practicing:
- Install the virtualization platform:
virthost[/opt/centos7]# yum group install "Virtualization Host"
- Start libvirtd:
virthost[/opt/centos7]# systemctl enable libvirtd
ln -s '/usr/lib/systemd/system/libvirtd.service' '/etc/systemd/system/multi-user.target.wants/libvirtd.service'
virthost[/opt/centos7]# systemctl enable libvirt-guests
ln -s '/usr/lib/systemd/system/libvirt-guests.service' '/etc/systemd/system/multi-user.target.wants/libvirt-guests.service'

virthost[/opt/centos7]# systemctl start libvirtd
virthost[/opt/centos7]#
Note that libvirtd started, by default, a bridge called virbr0:
virthost[/opt/centos7]# ip addr show virbr0
 27: virbr0: <BROADCAST,MULTICAST,UP,LOWER_UP> mtu 1500 qdisc noqueue state UP
 link/ether 52:54:00:12:a4:47 brd ff:ff:ff:ff:ff:ff
 inet 192.168.122.1/24 brd 192.168.122.255 scope global virbr0
 valid_lft forever preferred_lft forever
This network connects the virtual machines with the host’s public network, so we don’t want to use it on our isolated lab environment.
- Download the CentOS7 image from here, and save it to /opt/centos7
- Download the tar file that contains the kickstart, virtual machines and network definition files from here, and extract to /opt/centos7. When you’re done, you should have these files:
virthost[/opt/centos7]# wget -q -O Example.tgz http://bit.ly/1F4dnkR
virthost[/opt/centos7]# tar -xzf Example.tgz
virthost[/opt/centos7]# ll
total 4209696
-rw-r--r--. 1 root root 4310695936 Apr 20 16:01 CentOS-7-x86_64-DVD-1503-01.iso
-rw-r--r--. 1 root root 215 Apr 20 16:00 internal.xml
-rw-r--r--. 1 root root 2355 Apr 20 18:59 labo100.xml
-rw-r--r--. 1 root root 16360 Apr 23 15:57 server.ks
-rw-r--r--. 1 root root 2941 Apr 20 16:13 server.xml
virthost[/opt/centos7]#
- Create the internal network, where server.example.com will provide the basic services:
virthost[/opt/centos7]# cat ./internal.xml
<network>
   <name>internal</name>
   <bridge name='virbr1' stp='on' delay='0' />
   <mac address='52:54:00:05:4e:d3'/>
   <domain name='internal'/>
   <ip address='10.11.1.1' netmask='255.255.255.0'></ip>
</network>
virthost[/opt/centos7]# virsh net-define ./internal.xml
Network internal defined from ./internal.xml
virthost[/opt/centos7]# virsh net-autostart internal
Network internal marked as autostarted
virthost[/opt/centos7]# virsh net-start internal
Network internal started
virthost[/opt/centos7]# ip addr show virbr1
72: virbr1: <BROADCAST,MULTICAST,UP,LOWER_UP> mtu 1500 qdisc noqueue state UP
 link/ether 52:54:00:05:4e:d3 brd ff:ff:ff:ff:ff:ff
 inet 10.11.1.1/24 brd 10.11.1.255 scope global virbr1
 valid_lft forever preferred_lft forever
- In the same way, define the server and at least a labo machine from the provided xml files. Then to create other lab environments, you can clone them on virt-manager.
virthost[/opt/centos7]# virsh define ./server.xml
Domain server defined from ./server.xml
virthost[/opt/centos7]# virsh define ./labo100.xml
Domain labo100 defined from ./labo100.xml
- You also have to create the hard drive files of those machines:
virthost[/opt/centos7]# qemu-img create -f raw /var/lib/libvirt/images/server.img 10G
Formatting '/var/lib/libvirt/images/server.img', fmt=raw size=10737418240
virthost[/opt/centos7]# qemu-img create -f raw /var/lib/libvirt/images/labo100.img 10G
Formatting '/var/lib/libvirt/images/labo100.img', fmt=raw size=10737418240
- Export /opt/centos7, so that Anaconda can use it to install the server through the provided kickstart file:
virthost[/opt/centos7]# cat /etc/exports
/opt/centos7 *(ro)
virthost[/opt/centos7]#
virthost[/opt/centos7]# systemctl start nfs
virthost[/opt/centos7]# exportfs -a
- And finally, on virt-manager, power up the server and “Run” the server booting from the iso. At the boot menu, modify the entry that reads “Install CentOS7” so that it points to the kickstart:
 Hit enter and let the kickstart do its magic. Few minutes later it will reboot. When you see the prompt, you can start installing lab environments.
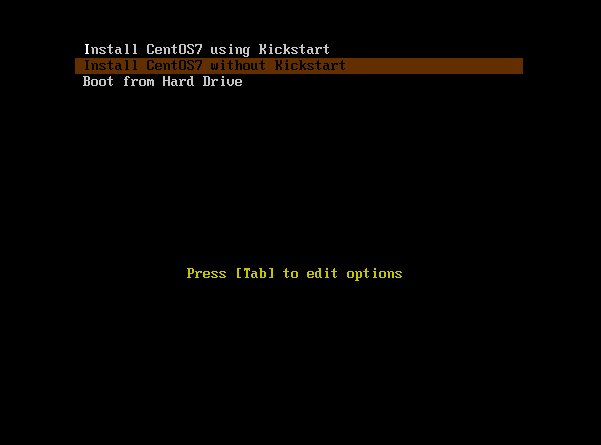
 - So, to deploy the OS on the previously defined lab machine, do “virsh start” or start it from virt-manager, and let it boot from its network interface. You should get this menu:
 Hit enter and let the kickstart do its magic. Few minutes later it will reboot. When you see the prompt, you can start installing lab environments.
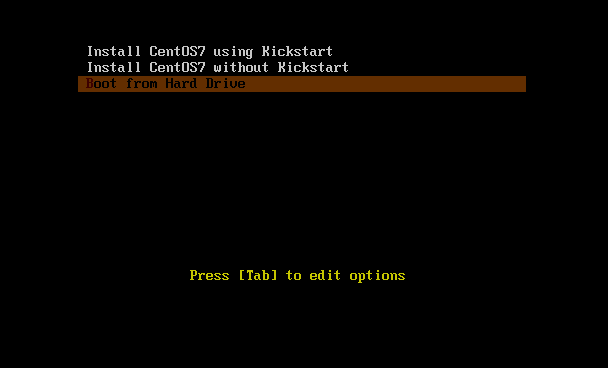
That’s all! Now you can practice all of the exam objectives. Remember that to reinstall a lab machine, you just need to boot from the network interface.
To reinstall the server, start from step 9 on this process, or, alternatively, create a snapshot or copy the server’s hard drive, for example, using virt-sparsify (VM needs to be down):
virthost[/opt/centos7]$ virt-sparsify -q /var/lib/libvirt/images/server.img /var/lib/libvirt/images/server_clean.img
virthost[/opt/centos7]$ ll -h /var/lib/libvirt/images/server.img /var/lib/libvirt/images/server_clean.img
-rw-r--r--. 1 root root 10G May 28 14:39 /var/lib/libvirt/images/server_clean.img
-rw-r--r--. 1 qemu qemu 10G May 28 09:06 /var/lib/libvirt/images/server.img
virthost[/opt/centos7]$ du -sh /var/lib/libvirt/images/server.img /var/lib/libvirt/images/server_clean.img
1.3G /var/lib/libvirt/images/server.img
1.1G /var/lib/libvirt/images/server_clean.img
virthost[/opt/centos7]$
Then when needed, copy the “server_clean.img” as “server.img” and power on the VM again. As simple as that. In case you’re wondering, all of the passwords are provided as clear text on the kickstart files.
Finally, some recommendations on objectives that you should practice on the labo machine:
- Configure a yum repository pointing to http://server.example.com/pub/centos7/repo/
- Add a network card and configure nic teaming/bonding
- Configure user authentication using LDAP y Kerberos
- Restrict access to lab using firewalld (or iptables)
- Share directories from server using NFS and/or Samba y secure them using Kerberos
- And anything else on the exam objectives list!
Good luck on your exams, and let me know if you have any question.


10 thoughts on “How to practice for Red Hat’s EX200 and EX300 exams”
Hi,
Your tutorial is interesting but you should elaborate on several points:
– you need a 64bit x86 processor with Intel VT-x or AMD-V capabilities otherwise KVM won’t work,
– you need at least 3GB of memory (1GB per VM plus 1Gb for the host) and perhaps 4GB,
– firewalld can be configured on the VMs but shouldn’t be used on the KVM host.
Also, re-installing each time from the ISO image is not very efficient when you can use LVM snapshot.
Even better you can:
– stop the VM,
– restore the Qemu image gotten from the first install with the virt-sparsify command,
– restart the VM.
This process takes less than one minute with a SSD disk, is very simple and keeps the disk space used minimal (thin provisioning).
Regards.
Thank you for your comment and recommendations, I will update my post accordingly. Some comments of my own:
True. I assumed most of the people would be able to do it, since even sub 200usd laptops have these requirements.
The whole idea of this is that the lab environment would impact as little as possible to the host. If users are running firewalld on the host, or not, I don’t really care, as long as the internal network is fully available to VMs.
Actually, the 10GB hard drive of the server occupies 1.3GB on disk. When I use virt-sparsify, its copy occupies 1.1GB, so either you spend 10 more minutes or use more space. Neither should be an issue though, we are not talking huge requirements.
Many thanks for this tutorial. I have successfully adapted it to deploy on VirtualBox and RHEL 7.1.
I have the following remarks:
– by default the server is using non-standard keyboard layout, I needed to change it to
us– the shell uses vi compatible mode, which I needed to change to standard emacs’ one
– in RHEL 7.1 network interfaces conform to Predictible Network Interfaces Names, which I needed to change in the kickstart file.
You have helped me a lot. Thanks!
Hi,
Thanks for your comment, glad it helped you. Yes, I had it setup with latam keyboard and originally posted in spanish, then translated to english but didn’t change all of the settings. As of the vi mode on bash, yeah, I’m so used to it that I can’t go back now, but you can safely do this changes on server.ks so that future builds and rebuilds will still get you setup as you prefer. As of RHEL7, I should look at that. Using traditional naming may work on many more configurations I can imagine, for example like you, using VirtualBox.
Eric
Things go smoothly until step 53. After powering on server and pointing to kickstart, my installation errors out with the following error messages:
mount: /dev/sr0 is write-protected, mounting read-only
Warning: could not boot.
Starting Dracut Emergency Shell…
any suggestions?
even for me the same issue
starting Dracut emergency shell
Hi
I’m trying to setup lab environment as you mention but without luck – i did everything as you said, and i have working server and lab machines(skeletons of this machines) but … my internal network doesn’t work. Machines doesn’t “see” each other and DHCP boot not working :(.
Some info from virsh:
virsh # net-list
Name State Autostart Persistent
———————————————————-
default active yes yes
internal active yes yes
virsh # net-info internal
Name: internal
UUID: d677063c-cf97-4e8a-ae89-1459e1560223
Active: yes
Persistent: yes
Autostart: yes
Bridge: virbr1
virsh # net-edit internal
internal
d677063c-cf97-4e8a-ae89-1459e1560223
And info from VM Host machine:
elitebook ~ # ip addr
1: lo: mtu 65536 qdisc noqueue state UNKNOWN group default qlen 1
link/loopback 00:00:00:00:00:00 brd 00:00:00:00:00:00
inet 127.0.0.1/8 brd 127.255.255.255 scope host lo
valid_lft forever preferred_lft forever
inet6 ::1/128 scope host
valid_lft forever preferred_lft forever
2: enp0s25: mtu 1500 qdisc pfifo_fast state UP group default qlen 1000
link/ether 70:5a:b6:99:83:f2 brd ff:ff:ff:ff:ff:ff
inet 192.168.2.16/24 brd 192.168.2.255 scope global dynamic enp0s25
valid_lft 37308sec preferred_lft 37308sec
inet6 fd9a:6038:f417::d1a/128 scope global dynamic
valid_lft 80511sec preferred_lft 80511sec
inet6 fe80::725a:b6ff:fe99:83f2/64 scope link
valid_lft forever preferred_lft forever
3: wlo1: mtu 1500 qdisc noop state DOWN group default qlen 1000
link/ether 00:23:14:2a:d0:c0 brd ff:ff:ff:ff:ff:ff
4: virbr1: mtu 1500 qdisc noqueue state DOWN group default qlen 1000
link/ether 52:54:00:bc:e2:0b brd ff:ff:ff:ff:ff:ff
inet 10.11.1.1/24 scope global virbr1
valid_lft forever preferred_lft forever
5: virbr1-nic: mtu 1500 qdisc noqueue master virbr1 state DOWN group default qlen 500
link/ether 52:54:00:bc:e2:0b brd ff:ff:ff:ff:ff:ff
6: virbr0: mtu 1500 qdisc noqueue state DOWN group default qlen 1000
link/ether 52:54:00:c3:9a:21 brd ff:ff:ff:ff:ff:ff
inet 192.168.122.1/24 scope global virbr0
valid_lft forever preferred_lft forever
7: virbr0-nic: mtu 1500 qdisc noqueue master virbr0 state DOWN group default qlen 500
link/ether 52:54:00:c3:9a:21 brd ff:ff:ff:ff:ff:ff
11: vboxnet0: mtu 1500 qdisc pfifo_fast state DOWN group default qlen 1000
link/ether 0a:00:27:00:00:00 brd ff:ff:ff:ff:ff:ff
Links are DOWN because i switched off my server VM.
I’ve fixed this 🙂 – it was all about NIC macs :), there were messed up :), eth1 was in external zone when it should be in internal and vice versa (with eth0) … THX.
Great! Good luck with the exams.
Thank you for this Post
I was struck while installing server via KS it was not getting the file,
had to allow nfs via firewall, so added
firewall-cmd –add-service=nfs –permanent
after which I was able to install server via KS